The Department have provided all staff and students in Victorian government schools with access to:
- install the Microsoft Office productivity suite (including Word, Excel, PowerPoint, OneNote etc.) on up to five devices at home or school. Devices can be PC, Mac, iOS or Android, and
- 1 terabyte of online storage for school work and curriculum material.
These capabilities are provided at no cost to school staff and students to support teaching requirements.
This quick guide enables you to start using your Office software and online storage to share documents with multiple people and devices, regardless of location, direct from the cloud.
- How do I access Office 365?
-
Your Department (staff) / eduPass (student) username has two formats:
- Simple:
- Example of staff simple username: 01234567
- Example of student simple username: abcd1
- Full:
- Example of staff full username: 01234567@education.vic.gov.au
- Example of student full username: abcd1@schools.vic.edu.au
As a general rule, when using a web browser you can use your simple username, whereas when using other apps you need to use your full username (for the first time only).

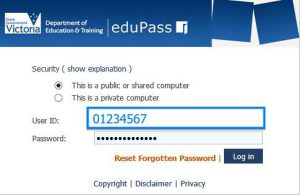
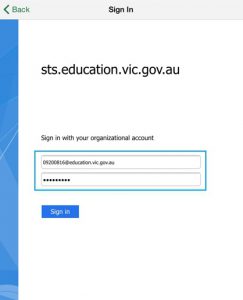
Log in as a staff
- Open Internet Explorer.
- Go to https://www.edustar.vic.edu.au/o365
- Login with your Department User ID and Password.
Log in as student
- Open Internet Explorer.
- Go to https://www.edustar.vic.edu.au/o365
- Log in with your eduPaSS User ID and Password.

- Simple:
- How do I install Microsoft Office on my Windows device?
-
To download and install Office on a Windows PC:
1. Go to https://www.edustar.vic.edu.au/office and login with your simple Department username (e.g. 01234567)
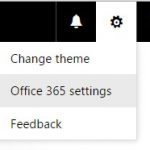
2. At the top-right corner of the Office 365 home page, go to Settings > Office 365 Settings > Software
3. On the Software page, under Install Office 365 ProPlus with the new 2016 apps, select Install to begin downloading the installer package.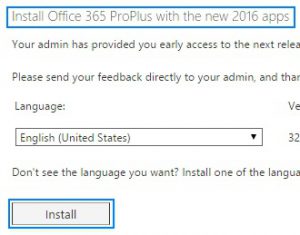
Note: This will download the newly released Microsoft Office 2016 software.
4. At the bottom of the browser, click Run, follow the prompts and accept the license agreement to complete the installation.

5. When prompted to Activate Office, enter your full Department Username and Password.
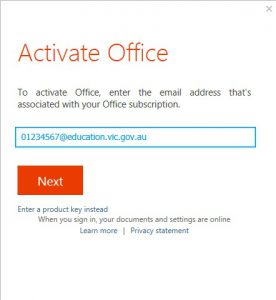
Please enter your full Username:
Example: 01234567@education.vic.gov.au
6. After installing, you can find the shortcuts to your Office applications (Words, Excel, PowerPoint…etc.) from your Windows desktop or Programs menu.
The Office 2016 installation process should uninstall your existing version of Office software automatically however sometimes that might not happen. In which case, please manually uninstall the software.
- How do I install Microsoft Office on my Mac?
-
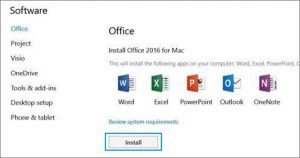
To download and install Office on Mac:
1. At the top-right corner of the Office 365 home page, go to Settings > Office 365 Settings > Software
2. On the Software page, under Install Office 2016 for Mac, select Install to begin downloading the installer package.
3. When the download has completed, open Finder , go to Downloads, and double-click Microsoft_Office_2016_Installer.pkg
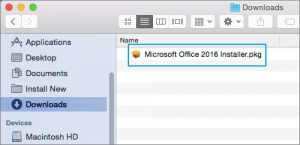
Finder is located on the Dock menu and is usually the first item from the left.
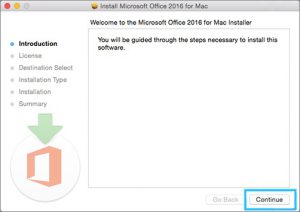
4. On the installation welcome page, select Continue to begin the installation.
5. Enter your Mac Username and Password, and select Install Software to complete the installation.

The Office 2016 installation process should uninstall your existing version of Office software automatically however sometimes that might not happen. In which case, please manually uninstall the software.
To activate your Office for Mac:
1. Following the installation, you will be prompted to activate your Office. At this point, click Get started.
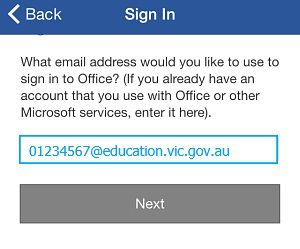
2. Select Sign in and enter your full Department Username and Password.
3. Follow the rest of the wizard to complete the activation.
Please enter your full Department Username:
For example:
Username: 01234567@education.vic.gov.au - How do I install Office on my iPad?
-
To download and install Office on an iPad:
1. Open the Apple AppStore and find the Office apps to install by searching for “Office 365”

2. Follow the on-screen instructions and when prompted to sign in, enter your simple Department Username and Password.
If you are already using Office apps on your iPad, you can add additional account:
1. Open Word, Excel, PowerPoint, or OneNote on your iPad.
2. Navigate to Account > Add a Service, enter your full Department Username and Password then select Sign in.
Please enter your full Department Username.
- How do I access my online storage using OneDrive for Business?
-
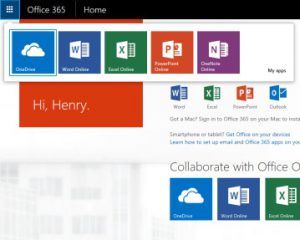
To start-up OneDrive:
On the Office 365 Home page, click the icon (top-left) then select OneDrive.
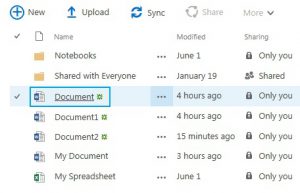
To open a document:
Click the document’s name under the Name column.
To upload a document:
You can upload documents in one of two ways:
1. Use the upload button. Click and choose a single file, or multiple files, to upload.
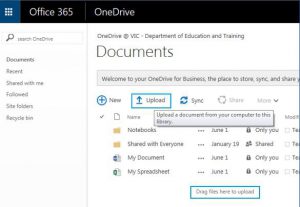
— or —
2. Drag-and-drop. Drag-and-drop the file(s) in the Documents page.
To create a new document:
New documents you create with, or upload to OneDrive, are private to you (invisible to everyone else). You can make them available to selected individuals by sharing them (see To share a document).
1. Click then choose the format.

You’ll be taken directly to the web application for the type of file you selected.2. To use the Office application instead of the web based version, an option is available from the toolbar.
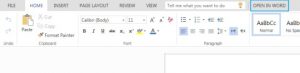
In our example here, select Open in Word.
To use revision management:
When you make updates and save a document on OneDrive, previous versions are kept. If mistakes emerge over the life of the document, you can go back to one of these versions to fix it.
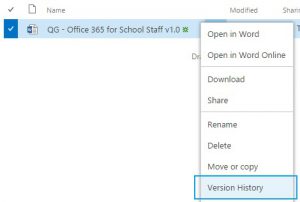
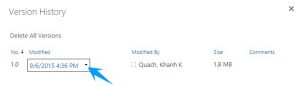
1. Navigate to the folder where the document you wish to roll back is located, right-click on the document and select Version History.
2. On the version you wish to revert to, click on the down-arrow and select Restore.
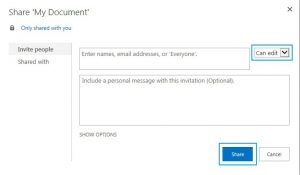
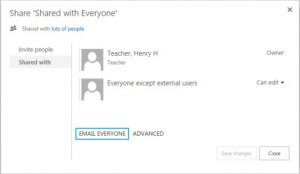
To share a document:
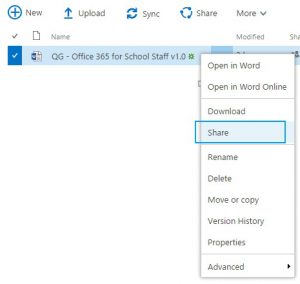
1. Right-click on the document you wish to share and select Share from the popup menu
2. In the popup, enter staff and student names, email addresses and groups.
3. Use the drop-down to assign Edit or View permissions then click Share
Alert me when something changes:
You can set up an alert for a document by ‘following’ it, so you are notified by email when updates occur.
1. Right click on the document, select Advanced and then Follow
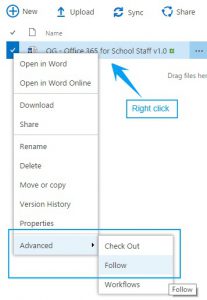
2. A confirmation message will appear at the top-right corner

To view a list of documents you are following, select Followed from the Browse menu on the left of your screen.
To co-author a shared file:
1. On the OneDrive page, right-click on the target document, select Advanced, and then Check Out.
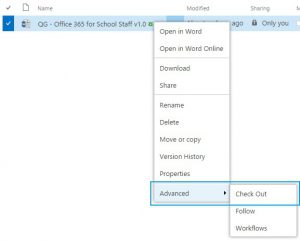
When a document is checked-out a green arrow appears over its icon.
2. When you are finished editing, check the document back in. Right-click on the document, select Advanced, and then Check In.
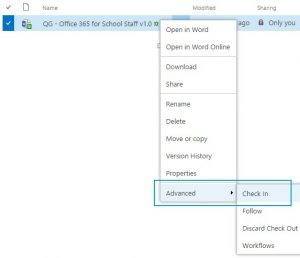
The option to Discard check out is useful for times where you want to cancel a ‘check out’ without making any changes.
To send an email to people you’re sharing with:
1. In the Sharing column, click the Shared icon alongside any OneDrive document.
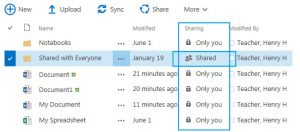
2. Click Email everyone to take you to a new email addressed to those you’ve shared with.
Sync online files to your device and take your work with you:
Compatible devices that can be used to sync files with OneDrive for Business include PC, iPhone, iPad and Windows Phone.
On the Documents page, click Sync.
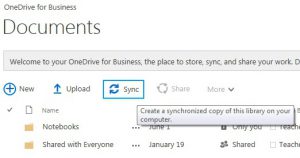
The OneDrive for Business app installs on your device and a folder is created. Everything you put in this folder will automatically sync between your device and your school, in the cloud.
The example here shows OneDrive for Business on the desktop’s system tray:
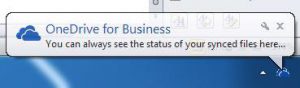
Whenever you add, change or delete files in one location, all the other locations will be updated.
Get the OneDrive for Business client for other devices:
To sync, your device needs a (free) OneDrive for Business application installed. Take care to download the Pro version, as the basic version is not compatible with this service.
PC
Microsoft Office 2013 already includes everything you need to sync files in the cloud with OneDrive.
For computers with earlier versions of Office, a separate client is available for download – paste the following address into your web browser, or click the link:http://go.microsoft.com/fwlink/?LinkID=511444&clcid=0x1409
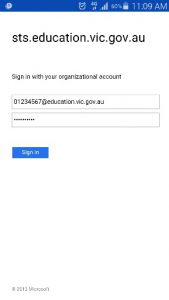
When you sync for the first time you may be asked for your username or email address – enter your full Department Username and Password, then click Sign in.
Mac
At this stage there is no OneDrive application available for Apple OSX.
iPad
Once installed, sign in using your full Department Username and Password.
Please enter your full Department Username.For example:
Username: 01234567@education.vic.gov.au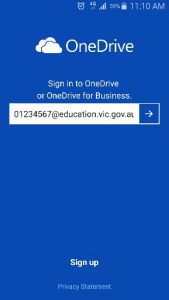 ⇒
⇒ 
- Support
-
Common issues:
I am unable to sign into OneDrive for Business mobile app
- Ensure that you can sign into OneDrive for Business from a web browser and successfully create a test document (see Page 4 above for further instructions).
The Office 2016 installation process did not uninstall my previous version of Office.
- You can uninstall the previous version of Office manually by following the Microsoft instructions (link below) or see your specialist technician for assistance.
- Uninstall Office for Windows
- Uninstall Office for Mac
See your Specialist Technician
Should your Specialist Technician be unable to resolve the issue they can escalate to the Department Service Desk.
Self Help
http://community.office365.com/en-us/default.aspx
Support for all other areas of Office 365 can be obtained via the Office 365 Self-help community.
Resources
Office 365 Learning Hub: https://www.microsoft.com/australia/o365learninghub/
OneNote: http://www.onenoteforteachers.com & http://www.onenote.com/classnotebook
Educator Community: http://education.microsoft.com/australia
Professional Learning Opportunities: http://aka.ms/msauedupd
Microsoft in the classroom: http://www.digipubs.vic.edu.au/pubs/microsoft-in-the-classroom/microsoft-in-the-classroom


